
Introduction
Image upload is a quite common feature that is used for profile picture upload in almost all web apps these days. It is hence worth understanding the technicalities involved in uploading and storing an image for the user. Images can be stored in folders present on our server or we can store it on cloud with aws, azure or google cloud.
Theoretically the concept or approach of uploading an image into aws S3 bucket remains same for any frontend application and not just nextjs. Infact using the same concept we can upload any file be it an image or document, audio/video or any other file.
There are different ways in which a file can be stored on the server -
- Physically on the server - File System Storage
- Database - Sql and NoSql Storage
- Cloud Blob Storage - AWS S3, Azure, Google Cloud
Benefits of Cloud Storage
The benefits of the cloud storage over the others are numerous.
- Automatic Scaling: Cloud storage services can automatically scale to accommodate increasing amounts of data without the need for manual intervention or additional hardware.
- Elasticity: Easily scale storage up or down based on demand, paying only for the storage you actually use.
- Cost Efficiency Pay-as-You-Go: Cloud storage typically operates on a pay-as-you-go model, where you only pay for the storage capacity and data transfer you use.
- Reduced Upfront Costs: Eliminates the need for significant upfront investments in hardware, reducing capital expenditure.
- Accessibility Global Accessibility: Access data from anywhere with an internet connection, facilitating remote work and collaboration.
- Cross-Platform Access: Supports access from various devices and operating systems.
- Reliability and Durability High Availability: Cloud storage providers often offer Service Level Agreements (SLAs) guaranteeing high availability (e.g., 99.99% uptime).
- Redundancy and Replication: Data is typically replicated across multiple geographic regions and data centers, ensuring durability and protecting against data loss.
- Security Advanced Security Features: Includes encryption at rest and in transit, access control policies, and identity management.
- Compliance: Many cloud providers comply with industry standards and regulations (e.g., GDPR, HIPAA, ISO) to ensure data protection.
- Managed Services: Cloud storage is maintained by the provider, reducing the need for in-house IT maintenance.
- Automatic Updates: Providers handle updates and maintenance, ensuring the storage infrastructure is always up-to-date with the latest security patches and features.
- Ecosystem Integration: Cloud storage seamlessly integrates with other cloud services, such as compute (e.g., AWS EC2), databases (e.g., Amazon RDS), and machine learning (e.g., AWS SageMaker).
- API Access: Provides robust APIs for integration with custom applications and workflows.
- Built-in Backup Solutions: Many cloud providers offer built-in backup and disaster recovery options, ensuring business continuity.
- Geographic Redundancy: Data can be stored in multiple regions to protect against regional failures.
- Real-time Collaboration: Facilitates real-time collaboration on files, allowing multiple users to access and edit documents simultaneously.
- Version Control: Some cloud storage solutions offer versioning features, allowing users to revert to previous versions of files.
- Optimized for Speed: Cloud providers often have multiple data centers worldwide, reducing latency and improving access speeds for global users.
- Content Delivery Networks (CDNs): Many providers integrate with CDNs to further enhance content delivery speeds.
- Support for Various Data Types: Can store a wide range of data types, from simple files to large datasets for big data analytics.
- Innovative Features: Cloud providers frequently introduce new features and services, allowing businesses to leverage the latest technologies.
We will cover this implementation in 2 parts. In this Part 1 we will see the way to upload an image from nextjs application to aws s3 bucket using presigned url. We will focus more on the design and architecture aspect of uploading an image than just going through the code. In Part 2 we will go through the code right from creating a new nextjs app, creating and handling routes, generating presigned url and uploading image to S3.
There are a few prerequisites for the implementation but the concept can be understood even without the understanding of them. You can refer to the documentation of aws in order to setup your aws account.
- Nextjs App
- AWS S3 (Simple Storage Service)
Nextjs App
Nextjs needs no introduction as it is a widely used react framework for developing a fullstack web application.
Within a nextjs app we can have not just the react components but also API route handlers that can handle
requests made from client and serve the clients with the data or functionality they need.
In a traditional react app we make use of api calls to serve the requests but in a nextjs app we can have the
apis build with the help of route handlers without having the need to develop apis separately in backend
technologies like nodejs,java,dotnet etc...
Having said that , there are certain limitations of route handler and they should not be considered as a
replacement of dedicated api servers.
In order to get started with the image upload from our nextjs app to aws S3 buckets let us create a new nextjs app.
AWS S3 (Simple Storage Service)
AWS is the cloud service from Amazon and S3 is Simple Storage Service which is used for storing blob data on cloud like images, pdf, audio, video. S3 offers industry leading scalability, data availability, security and performance. It is cost effective and easy to use and hence it is being used by millions of clients across the globe.
Configuring S3 Bucket
To get started with aws S3 you would need to create an account with aws. This would need you to enter your payment details but trust me it has got very decent free tier so that we can learn and try using aws.
You would also need to create a new IAM user and create a bucket in S3 which can be used to upload images from the nextjs app.
It is a common practise to create an IAM user rather than working with the primary user account for security reasons since the primary user account has all the relevant access by default. After the account and IAM user creation the next step is to create a bucket in S3 and give relevant access for S3 bucket to the user. While creating the bucket you can select the option to block all public access to the bucket to avoid misuse of the bucket from unauthorized users.
Interacting with aws from nextjs app
Amazon provides an SDK which we can install in our nextjs app to interact with the different components present inside aws. We are going to install the component for interacting with s3. The latest version of aws as of writing this article is v3 and we can install it in our nextjs app with the following command.
npm i @aws-sdk/client-s3AWS has got support for most of common programming languages to access aws components programmatically.
Now that we have set up our nextjs app and aws s3 bucket let us now go through the architecture of uploading an image to S3.
Image Upload Architecture
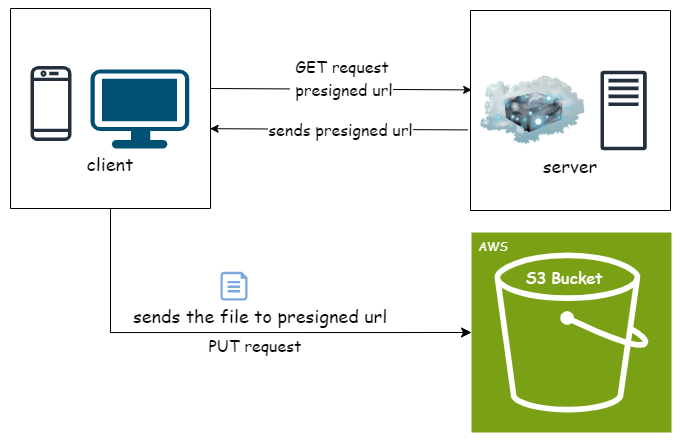
As we can see from the figure above that the client will send a request to the server for a presigned url and the server will generate the presigned url and send it to the client. The client then makes a PUT request to the presigned URL in order to upload the file to the S3 bucket.
The image is uploaded to S3 using presigned URLs but what exactly is a presigned URL ?
Presigned URLs in S3
As we have seen earlier that we created an IAM user with relevant access to S3 bucket. This user will have and access key and a secret key to access aws resources programmatically. This simply means that using the access key and secret key of an IAM user we can access any aws resources to which the IAM user has access to programmatically. In our case S3 bucket is the resource that we will try to programmatically access using the keys of the IAM user. Presigned URLs are the URLs that are generated using the keys of an IAM User so that anyone not having access to aws resource (in ur case S3 bucket) can gain a temporary access to the resource without updating the bucket policy.
This is exactly what we are seeing in the diagram above. The client does not have direct access to AWS S3 bucket. The client sends a request to the server to generate a presigned URL since the server has the keys of the IAM User to generate presigned URL. Using the presigned URL returned by the server the client can now upload the image to the S3 bucket directly.
Presigned URLs has a definite purpose. This means that the client must request the server for a specific
action (GET, PUT, POST, DELETE etc...) and also for a specific resource i.e. specific file. This specific
resource is termed as key in S3 terminology.
A presigned URL that is generated to upload a file named my_profile_pic.jpg to S3 cannot be used to view
the file directly from S3.
In order to view the file from S3 client will have to ask for a presigned URL with GET access to the file
my_profile_pic.jpg and the server will then generate a time limited presigned URL to view the file
from S3.
Note that we have mentioned time limited, as the presigned URLs are generated with an expiry time after which the URL will not be valid for the purpose it was generated for.
Yes, so expiry time has to be passed while generating a presigned URL and the server present in our diagram does that for the client to prevent unauthorized access to the resource.
Generating a presigned URL
When our server generates a presigned URL for the client it has to pass the following to aws in order to get a valid presigned URL in return -
- access key
- secret key
- s3 bucket name
- an object key (if downloading this object will be in our S3 bucket, if uploading this is the file name to be uploaded).
- an operation or command (GET,PUT,POST,DELETE,HEAD)
- expiry time in seconds
If we are using nodejs/javascript we need the below packages to generate a presigned URL -
npm i @aws-sdk/client-s3
npm i @aws-sdk/s3-request-presigner
The first step is to import the above packages.
import { getSignedUrl } from "@aws-sdk/s3-request-presigner";
import { S3Client, GetObjectCommand } from "@aws-sdk/client-s3";
The second step is to create the client
const region = process.env.S3_REGION;
const accessKeyId = process.env.S3_ACCESS_KEY as string;
const secretAccessKey = process.env.S3_SECRET_KEY as string;
const client = new S3Client({
  region,
  credentials: {
    accessKeyId,
    secretAccessKey,
  },
});
The third step is to create the command GET/PUT/DELETE etc...
const getCommand = new GetObjectCommand({
    Bucket: process.env.S3_BUCKET_NAME,
    Key: file,
  });
The last step is to generate the presigned URL -
const url = await getSignedUrl(client, command, { expiresIn: 60 });Conclusion
Well, we have pretty much got an idea of uploading images or any file into S3 and how we can benefit from the cloud storage over any other traditional storage system. The upload using a presigned URL offloads the upload responsibility from the server to the client , which can be useful for reducing the server load and bandwidth usage. We understood the prerequisites of uploading an image into S3 and also got a brief understanding of how nextjs makes it much easy to implement the functionality with the route handlers and client components.
That being said there are a lot more to think and cover when building an image upload system. Some of these points includes -
-
Tracking the files uploaded by the client into a database.
- File name
- File path
-
Validating the files uploaded on the server. The validations can be of multiple types -
- Size check
- Access to upload the file based on the logged in clients
- Managing access for deleting or updating an image by the clients
- File format validation.
In our next post we will do a quick walkthrough of "Upload an image from nextjs to aws S3 bucket - Part 1".
Thank you for reading and see you in the next post !👋